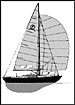
| International Folkboat Tech Tips
Halyards Led Aft |
 The standard arrangement for a Mariholm's running rigging is to lead
the lines straight back on the coach roof to a series of jam cleats.
However, some IF sailors have modified this so that the lines go through
the dodger coaming. This is one example. (editor)
The standard arrangement for a Mariholm's running rigging is to lead
the lines straight back on the coach roof to a series of jam cleats.
However, some IF sailors have modified this so that the lines go through
the dodger coaming. This is one example. (editor)
Greg Curtis writes:
Here is a brief account of the epic that followed the decision to lead
the lines on my IF boat aft. In retrospect I'm very happy with the results,
but it was a lot of work.
My boat originally had all halyards and lifts led to the bottom of the mast. The jib halyard led to a small winch and the main to a large cleat; it was necessary to use a 4 to 1 purchase on the downhaul to obtain adequate luff tension on the main. I wanted to lead lines aft with as little friction as possible to facilitate singlehanding with as few trips as possible to the mast.
I started by planning the deck arrangement. The sheave block at the base of my mast has four sheaves, two exiting straight forward and two straight aft. (A neighbor's IF boat has sheaves that exit at 45 degree angles; this, as you will see later, would greatly have simplified the work. But I chose to use what I had.)
Because I had the mast down anyway, I installed a stainless steel plate with holes for shackles underneath the mast step. The mast is simply pinned to the step, and the step is held in place with large lugs, or wood screws. I had a boatyard drill the steel plate to match the lug holes on the mast step and glue the plate to the deck, and the step to the plate, with 3M 5200. The mast is pinned to the step as before.
Next, I removed the head liner to see what was underneath the coach roof. Before the liner would come out, it was necessary to remove the nonstructural bulkhead that separates the head from the cabin and the board that acts as facing for the hanging locker; these brace the head liner from underneath and provide stiffness to the coach roof.
With the liner removed, I could see the stiffening battens (of marine plywood) that are molded lengthwise into the roof. The battens are about two inches wide, about a foot apart, and protrude about 1/4 inch down from the roof, like corrugations. The battens were a problem for mounting hardware. Almost every piece of hardware I wanted to use either spanned a batten or had to be mounted partly on a batten and partly on bare fiberglass. I solved this problem by filling in the space between the battens, at the locations where I wished to mount hardware, with 1/4 inch marine plywood well saturated with epoxy. To glue the plywood pieces to the roof, I first sanded the roof with rough sandpaper (about 30 grit, I think), and used West System epoxy with collodial silica filler. This worked really well; it gave me a stable, level, strong platform for hardware.
(Replacing the liner, when I was finished, was very difficult. The hard parts were bending and forcing the fiberboard back into place, and lining up the screw holes with the battens. The screws have to go back into the battens; the bare fiberglass is not thick enough to hold them. The bolt ends, nuts, and backing plates change the geometry of the roof just enough to make the job maddening. The liner is more than just decorative; it protects head from bolt ends and adds needed stiffness to the coach-top.)
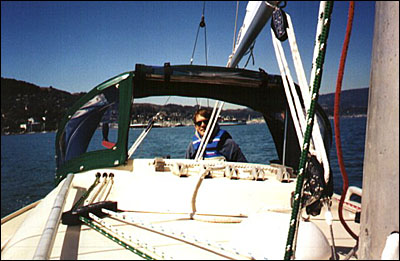
I wanted to run all lines possible through the coaming on the coach-top, port and starboard of the companionway. This would take the lines underneath the dodger. To achieve this it was necessary to turn the lines twice, once immediately (about 4 or 5 inches) aft of the mast and once again about midway between the first set of blocks and the coaming. (See the photo.) (I had to experiment for some time to determine which placement of the turning blocks would minimize the angle of deflection and, thus, the shear load on the blocks.) For the turning blocks, both at the base of the mast and the intermediate blocks, I used 3 Harken triple-sheave deck organizers, the smaller size. The spacing between the number 1 and 3 sheaves fortunately matched the spacing of the aft-exiting sheaves at the mast base. In order to keep the sheaves vertically fair, I used Delrin blocks with the same footprint as the deck organizers. The block behind the mast is about 2 inches thick; the others are about 1 inch thick.
To lead the lines through the combing, I used a one inch hole saw to cut through the combing on both sides. (It is hollow.) I then cut PVC tubing of appropriate diameter to the approximate length, roughened the tubing with sandpaper, and used colored epoxy putty to glue the tubes into place. Much sanding, fairing, and gel coating was necessary to make the result look good. (See the photo.) In retrospect, if I had to do this job again, I would probably just use ferrules on the holes!
Aft of the combing (i.e., inside the dodger and alongside the companionway on top of the house) I installed Spinlock triple rope clutches; I used the XA's because they are relatively inexpensive and accommodate a wide range of line diameters. I had determined in advance that the holes in the combing would lead the lines fairly and without chafe to the holes in the clutches. (Large holes help here.) Aft of the clutches are number 10 Andersen stainless steel winches, which matched the Andersen sheet winches that the factory had put on the boat.
Some changes had to be made to the mast, as well. The main now halyard exits aft and starboard, over the deck to the cabin-top winch. (As I no longer need a downhaul and have locked the gooseneck in place with a bolt.) The topping lift is now internal, as follows: At the mast head, on the port side, is an eye-strap holding a Harken small bullet block. The topping lift goes through this block, enters the mast through a hole fitted with an exit plate, and exits the mast though another hole/exit plate about three feet from the base. The lift goes through another block shackled to the plate at the base of the mast and then aft through the combing to the rope clutch. The spinnaker topping lift is similarly arranged, except that it uses the existing sheave on the forward side of the mast.
I left the jib halyard where it was, namely, led to a winch on the mast. To facilitate singlehanding I had a rigger install a Harken Unit 0 furler. (The furler is the one thing with which I'm not entirely happy; but I'll leave this for another day.)
I'm still experimenting with reefing, but this is what I'm doing now; it seems to work well: My boom (a new one -- the factory boom was badly corroded) has a triple sheave box at the aft end. The reefing outhaul goes around one of the sheaves, through the inside of the boom, exits about three feet aft of the gooseneck through a slot, goes around a check block just aft of the gooseneck, down through a block shacked to the steel plate at the base of the mast, and aft to the cockpit. (The flattener works the same way.) Presently the outhaul, which has an internal purchase, cleats underneath the boom.
The reefing downhaul ends in a small cunningham hook; this way I can leave the downhaul unattached until I need it and the sail goes up more easily. The line runs through a block shackled to an eye-strap on the mast (for positioning), through another block at the base of the mast, and aft to the cockpit.
(Anyone who wonders when one might wish to reef an IF boat might look at pages 142 and 143 of the June, 1998, edition of Latitude 38, the San Francisco sailing monthly, which shows IF boat number 377 in a blow, reefed with its window half buried.)
That's about it for leading the lines aft. Here are a few more things I've done to the boat:
After the sail-maker laughed at my backstay adjuster, I took his advice and added a 16 to 1 tackle involving two wire blocks and two rope fiddles. Now I can get enough bend to flatten the main without hurting my hand.
I replaced the old gate valves on the thru-hulls with ball valves. Inspection ports in the cockpit lockers afford access.
See Also:
Mastfot och skotbänk
There is an English translation at the bottom.
[ home ]